SharePoint is a powerful collaboration and document management platform used by businesses around the world. With its wide range of features, SharePoint enables teams to work more efficiently by managing documents, sharing files, and collaborating on projects.
One of the most useful features in SharePoint is the ability to drag and drop files directly into document libraries, simplifying file uploads and improving the user experience. However, enabling this feature might not always be straightforward. How do I enable drag and drop in SharePoint?
At Centric, we specialize in SharePoint consulting, helping businesses like yours optimize document management systems and improve overall user productivity. Let’s dive into enabling this feature for a more efficient SharePoint experience.
In this guide, you'll learn how to enable drag and drop in SharePoint, whether you're using SharePoint Online or an on-premises version. We’ll walk you through the prerequisites, configuration steps, and troubleshooting tips to ensure you can implement this feature seamlessly. Additionally, we’ll cover best practices to enhance the drag and drop experience for your team.
What is the Drag and Drop Feature in SharePoint?
The SharePoint drag and drop functionality allows users to easily upload files and documents by dragging them from their local computer or network folder directly into a SharePoint document library.
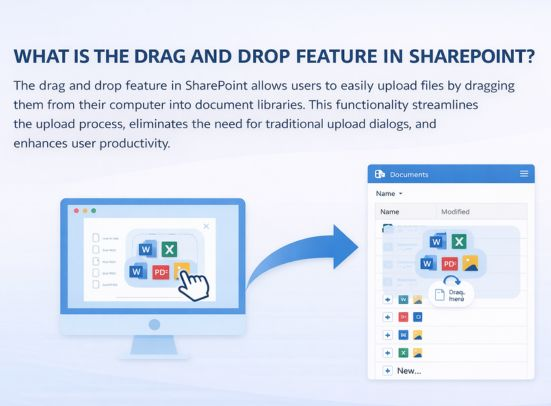
This feature eliminates the need for users to manually browse through file dialogs or use upload buttons, making the process faster and more intuitive. With SharePoint document management, this functionality enhances the way businesses manage and share documents, allowing for a more seamless workflow.
Whether you're working with images, Word documents, Excel files, or PDFs, the SharePoint drag and drop functionality enables a smoother user experience by reducing the time spent on uploading files, ultimately boosting productivity.
Why Should You Use Drag and Drop in SharePoint?
Enabling drag and drop in SharePoint offers numerous benefits for end-users, making document management more efficient. By simplifying the upload process, users can quickly transfer files without unnecessary steps, allowing them to focus more on their core tasks.
The SharePoint drag and drop functionality enhances user experience by offering a more intuitive interface that aligns with the expectations of modern, user-friendly platforms.
Additionally, it reduces training time and helps employees avoid frustration by streamlining the document upload process. This improved workflow leads to higher productivity and better collaboration across teams, as documents are uploaded faster and can be accessed in real time.
With SharePoint document management made more efficient, businesses can save time, reduce manual errors, and maintain a well-organized system for managing their documents.
Check Our SharePoint Consulting Services
Enabling Drag and Drop in SharePoint: A Step-by-Step Guide
Enabling the drag and drop files SharePoint feature is a straightforward process, but there are a few prerequisites to consider before you can fully utilize this functionality. In this section, we will walk you through the necessary steps to enable drag and drop in SharePoint libraries, both in SharePoint Online and on-premises versions.
Whether you are a new user or looking to optimize your existing setup, this guide will help you get the feature up and running smoothly.
Prerequisites for Enabling Drag and Drop in SharePoint
Before enabling drag and drop in SharePoint libraries, it’s important to ensure that your environment meets certain prerequisites. These conditions will help ensure that the feature functions properly and that you can make the most of SharePoint document management tips.
- SharePoint Version: Ensure you're using SharePoint 2016 or later for full functionality of drag and drop.
- Browser Compatibility: Use modern browsers such as Google Chrome, Microsoft Edge, or Mozilla Firefox, as older browsers like Internet Explorer may not support this feature.
- Permissions: Ensure users have the correct permissions to upload and manage files in SharePoint libraries.
Enabling Drag and Drop in SharePoint Online
For SharePoint Online, the process to enable drag and drop in SharePoint libraries is relatively simple. However, before proceeding, make sure your document library is configured to support modern features. Follow these steps:
- Step 1: Open your document library in SharePoint Online.
- Step 2: Click the settings gear in the top-right corner and choose Library Settings.
- Step 3: Under Advanced Settings, make sure "Allow management of content types" is enabled.
- Step 4: Once these settings are configured, you should be able to drag and drop files SharePoint directly into the document library.
Enabling Drag and Drop in SharePoint On-Premises
For on-premises versions of SharePoint, the configuration process is slightly more involved. You'll need to ensure the system supports modern document management features and has been updated for compatibility with drag and drop. Here's how to enable it:
- Step 1: Make sure you're using SharePoint 2016 or later on your server.
- Step 2: Enable the Document Library Web Part in the SharePoint settings for the document libraries.
- Step 3: Ensure the server is configured for client-side scripting and supports modern browsers.
- Step 4: Once everything is set, users should be able to drag and drop files SharePoint seamlessly.
Explore Our On-Premises Intranet Service
3 Troubleshooting Common Issues with Drag and Drop in SharePoint
While enabling drag and drop SharePoint features can significantly enhance the SharePoint user experience improvements, it’s common to encounter some issues during the setup or usage. In this section, we’ll explore some of the most common problems and how to troubleshoot them.
Whether it’s browser compatibility, permissions, or file size limitations, we’ll cover practical solutions to ensure smooth document uploads.
1. Browser Compatibility Issues
Browser compatibility is one of the most common issues users face when utilizing drag and drop SharePoint features. Not all browsers fully support the drag and drop functionality in SharePoint, especially older versions of Internet Explorer. To address this, it’s important to ensure that users are using modern browsers such as Google Chrome, Microsoft Edge, or Mozilla Firefox.
Another key consideration is keeping these browsers up to date, as older versions may not support the latest SharePoint customization options. If users are still experiencing issues, clearing the browser cache or testing the feature in an incognito window can help resolve conflicts caused by cached data.
2. Permissions and Access Control
Permissions and access control play a significant role in SharePoint document upload behavior. If users do not have the appropriate permissions to upload or manage documents within a library, they may not be able to utilize the drag and drop functionality.
To fix this issue, verify that the user has sufficient permissions (such as Edit or Contribute rights) within the document library. Additionally, ensure that SharePoint customization options like security settings and permission inheritance are properly configured to allow document uploads.
Sometimes, customizing user permissions in SharePoint might inadvertently block certain actions, including drag and drop.
3. File Size and Type Limitations
File size and type limitations can hinder the drag and drop SharePoint features if files exceed the limits set within SharePoint or the browser. For example, SharePoint has a default upload size limit for files, which may be smaller than the size of some large files. This could prevent users from successfully uploading documents through the drag and drop method.
To resolve this, check the settings within the SharePoint document upload configuration and increase the upload size limit if necessary. Additionally, ensure that the file types being uploaded are supported by SharePoint; certain file formats might need to be explicitly allowed within the SharePoint library settings.
4 Best Practices for Using Drag and Drop in SharePoint
To fully maximize the potential of drag and drop SharePoint features, it's essential to implement best practices that enhance both the user experience and the efficiency of document management.
Properly organizing SharePoint libraries and ensuring that users are well-trained will improve the overall drag and drop experience. In this section, we’ll explore key tips for structuring libraries and training users to make the most of this powerful functionality.

1. Organizing SharePoint Libraries for Better Drag and Drop Experience
Effective organization of SharePoint libraries is crucial for a smooth drag and drop SharePoint features experience. Start by creating a clear folder structure with categories that make sense to the users, so they can quickly find where to upload their files. This includes organizing documents by departments, projects, or content types.
Additionally, configuring metadata columns for sorting and filtering can improve the SharePoint document upload process, making it easier for users to navigate the library. Avoid overly complex or nested folders, as they can make drag and drop actions slower and more cumbersome.
2. How to Train Users on the Drag and Drop Feature
Training is essential to ensuring that users understand how to use drag and drop SharePoint features effectively. Start by providing a basic overview of how to upload files through drag and drop and emphasize the time-saving benefits of this method.
You can use hands-on training sessions, recorded tutorials, or step-by-step guides to show users the process in action. It's also helpful to set up sandbox environments where employees can practice without the risk of modifying important documents. Regular reminders about proper file naming conventions, folder structures, and file size limitations will keep the system organized.
3. Setting Up Custom Views for Better Drag and Drop Accessibility
Custom views within SharePoint can enhance the SharePoint document upload process by displaying relevant metadata and creating filters for easier file organization. For example, you can set up views that highlight the most recently uploaded documents or those that need approval.
Custom views help users see only the files they need, making it easier for them to find the correct location for their drag and drop action. Consider setting up views for different teams, departments, or project types to improve accessibility and usability.
4. Maintaining a Consistent File Naming Convention
One of the most effective ways to streamline the drag and drop process is to implement a consistent file naming convention across your SharePoint document libraries. When users drag and drop files, a standardized naming system helps them identify and organize files more easily. This also prevents errors when searching for files or when files with similar names are uploaded.
A clear naming structure, combined with custom metadata and folder organization, allows for more efficient use of the drag and drop functionality and contributes to better SharePoint document management.
4 Advanced Tips for Customizing Drag and Drop in SharePoint
While drag and drop SharePoint features offer a great deal of functionality out of the box, advanced customizations can provide even more power and flexibility. By leveraging tools like Power Automate and the SharePoint Framework (SPFx), organizations can tailor the drag and drop experience to suit their unique needs.
In this section, we’ll dive into some advanced tips and techniques for customizing the drag and drop functionality in SharePoint.
1. Customizing Drag and Drop Behavior with Power Automate
Power Automate offers a powerful way to create custom workflows that can enhance the drag and drop SharePoint features. With Power Automate, you can automate actions triggered by the drag and drop process, such as sending notifications, updating metadata, or moving files between document libraries.
For example, you can create a workflow that automatically assigns document tags or sends an approval request whenever a user uploads a file through drag and drop. This helps streamline business processes and reduces manual steps, improving efficiency and accuracy in SharePoint document management.
2. Using SharePoint Framework (SPFx) for Custom Solutions
The SharePoint Framework (SPFx) is a powerful tool that allows for advanced customization of SharePoint sites, including drag and drop functionality. Using SPFx, you can create custom web parts that integrate with the drag and drop feature, allowing users to interact with files in unique ways.
For example, you can build a custom document upload interface that provides additional functionality, such as real-time progress tracking or the ability to preview files before uploading. SPFx enables organizations to leverage SharePoint customization options to create a more tailored and seamless user experience.
3. Extending Drag and Drop with Third-Party Tools
In addition to Power Automate and SPFx, third-party tools can be used to extend drag and drop SharePoint features. Some third-party solutions offer more advanced file management features, such as enhanced file previews, drag-and-drop from external sources, or the ability to upload multiple files simultaneously with drag and drop.
These tools can be integrated with SharePoint to provide more robust document management capabilities, ensuring that the SharePoint document upload process meets your organization's specific needs.
4. Leveraging Microsoft Graph API for Custom File Operations
For more advanced customizations, the Microsoft Graph API can be used to interact with SharePoint document libraries programmatically. This API allows you to extend drag and drop functionality by performing custom file operations such as creating folders, moving files between libraries, or applying specific metadata after a file is uploaded.
By integrating Microsoft Graph API with SharePoint, you can automate tasks that go beyond basic drag and drop, further enhancing the SharePoint user experience improvements and streamlining document management processes.
FAQs
What is Drag and Drop in SharePoint?
Drag and drop in SharePoint allows users to upload files by simply dragging them from their local drive and dropping them into SharePoint document libraries. This feature enhances user experience by making file uploads faster and more intuitive, requiring no manual browsing.
How do I enable drag and drop in SharePoint?
To enable drag and drop in SharePoint, ensure you're using SharePoint 2016 or later. Configure document libraries to support modern features and ensure users are using compatible browsers like Chrome, Edge, or Firefox. This setup enables seamless file uploads.
Why are drag and drop features important in SharePoint?
Drag and drop features improve SharePoint document management by simplifying file uploads, saving time, and reducing errors. It enhances the overall SharePoint user experience improvements, making it easier for employees to interact with files without complicated processes, boosting productivity.
Can I customize the drag and drop functionality in SharePoint?
Yes, you can customize drag and drop SharePoint features using Power Automate for automating workflows or SharePoint Framework (SPFx) to create custom solutions. These customizations improve the functionality, offering tailored file management options for your organization's needs.
Conclusion
Understanding How Do I Enable Drag and Drop in SharePoint is essential for improving the efficiency of document management within SharePoint. By enabling this feature, businesses can simplify the process of uploading files, making it faster and more intuitive.
Implementing drag and drop in SharePoint not only boosts productivity but also enhances user satisfaction by making workflows more efficient. Centric, with its extensive experience in SharePoint consulting, helps businesses optimize SharePoint’s features, ensuring smooth implementations and maximizing the platform's potential.